How to Build Your Own Cable Pulley System
Sometimes people like to work out at home, and other times—such as during the global Covid-19 pandemic—they have no choice. For a lot of people, this means relying on bodyweight exercises or routines that rely on minimal equipment (resistance bands, a pullup bar, etc.).
For those who have home gyms, they probably have a couple dumbbells, a few plates, and maybe even a barbell. Some have a squat rack, which makes a profound difference.
But these are mostly free weights, which means you still can’t do any machine movements like triceps pushdowns or lat pulldowns, both of which require a cable pulley system. And there’s just no way you can manage that at home … or can you?
Here, we’ll show you how with $50 and a trip to your hardware store (an essential business), you can make yourself a cable pulley system and add a few more options to your at-home training game.
We’ll even include options for doing it in an apartment, just in case you’re not lucky enough to have a garage gym where you live.
Pick your location
To create this pulley system, you’ll first have to decide where you’re going to put it..
If you have a squat rack with a crossbar, the best place would be on top of the bar. If you don’t have a rack, you can opt to use a doorway pull-up bar; If it can hold your bodyweight, then it will hold your pulley system.
You can also hang it from your ceiling if you have a second floor joist or solid place to install a hook-screw. But be warned, you’ll have to keep the weight light so you don’t pull the screw out or potentially take a chunk out of your ceiling.
Once you determine your location, measure that space from the floor to the top. Keep that number on a piece of paper or on your phone because that is the amount of cable you’ll need. This will likely be too much cable when you set it up, but you would rather cut extra off than go buy another cable, so play it safe.
Items List
Keep in mind that the quality of your items will determine the quality of your system. You can pick the cheapest option, but you’ll likely be replacing parts, so you might as well get the best quality possible.
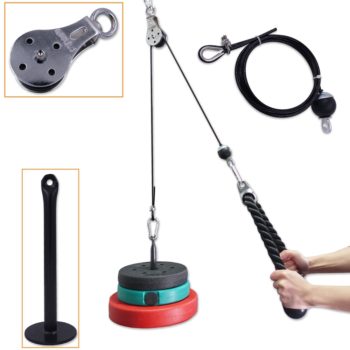
The pulley you’ll see in the photos cost $20 but holds more than 500 pounds, so I know it’ll work for whatever I am using. There are more affordable options, but make sure they’re tested to the weight you plan to use.
• ¾ inch iron pipe flange
• ¾ inch x 12 inch iron pipe straight piece (nipple)
• ¾ inch iron pipe tee
• 3/16 coated cable (also known as wire rope)
• 1 pair of wire cutters
• 2 rope clamps
• 1 pulley with a hook or loop on the top
• 1 hook screw or 1 chain (3 feet) (depending on where you hang)
• 2 carabiners
How to build
Start with the base: This is where you’ll put your weights. Simply screw together the flange and the straight pipe.
Next, screw on the tee so that the top has the two holes going across. Make sure it fits and that you can loosen this piece again — this is how you’ll adjust the weights.
Feed one end of the cable through the top of the tee. Once you have enough of the cable through the opposite end, connect it to the rest of the cable with one of your clamps. They will have to be tight so they don’t come loose while you’re pulling.
Then, feed the other end of the cable through the top of the pulley. Use enough that you can make a loop for your carabiner or for your attachment, should you decide to put it straight into the loop. Secure your loop with the other clamp.
The next step depends on how you plan to install it. If you have the rack or pullup bar, place the chain around the center of that place and connect it with the other carabiner. If you have the hook screw, install it into your location.
Your pulley should either have a loop or hook to connect it to your chain or hook screw. Connect your pulley so it’s secure to your anchor point. There may be more cable than you need on your system. If you find you have too much cable, undo your top portion of the cable and cut it with your wire cutters so that you have enough for a full range of motion without the base hitting the pulley. Once you have made this adjustment, secure your top portion of the cable again.
By the time you’re finished, the base should be touching the floor and the top of the cable should be a couple of inches below your pulley. Now you’re ready to test your system.
Using it
Undo your tee from your base and slide one plate onto the base. You can use either standard or Olympic weights. Once your weight is on the base, secure the tee on top. Place your attachment on the opposite end of the cable. It can be a rope, straight bar, or specific cable attachment if you have one. Either connect it to the carabiner or place it through the loop.
Take hold of the attachment and begin performing basic tricep pushdowns. Once you do a few reps, sit on a seat or on the floor and perform lat pulldowns. Finally, perform any other exercise you wish to use your system for. Make sure you use a controlled rep speed. Jerking the cable and letting the weight drop will result in swinging and potential damage.
Once you feel confident in your system, add a little more weight (5-10 pounds at a time) and repeat the previous steps. At no point should you max out on any exercise. If you must use a hook screw, you should focus more on doing controlled reps. If you have a pullup bar or rack, you can go a little heavier but still monitor how your system is responding.
Once you feel confident in your system, you’re good to go and can start adding exercises into your home workout plan.